Friday, December 30, 2011

Athenian Gothic + Custom Color Chalkboard Paint

Today I learned to use my camera remote! Coley came over to help me paint an accent wall in my kitchen, and we had fun playing with the remote.

The next coat of paint will be the same color, but treated to be a chalkboard wall! The formula is from Martha Stewart: start with any color flat finish latex paint. For each cup, mix in 2 tablespoons of unsanded tile grout. Be sure to mix well and break up the clumps!

Based on how much paint it took to do the first coat, I estimated I would need five cups of paint. I filled my mixing bucket (old washed out ice cream bucket) with 5 cups of water, and marked that level. When I'm ready to mix the paint, I can pour it right into the bucket without having to sacrifice a measuring cup.

I'll post the after photos when (or if?) we finish it on New Years Day!

Thursday, December 29, 2011

DIY: Twin Peaks-Inspired Painted Linoleum Floor Mat


Success!
I just put the last coat of polyurethane on my Twin Peaks Red Room inspired painted chevron linoleum floor mat. It's a fun alternative to painted floors, especially if you are a renter or change your mind frequently (I check yes to both of those!)

This project required much more time than I expected, and a well ventilated area that won't have much traffic over several days so that your coats of paint have plenty of time to dry.

Supplies:
- Lineolum Scrap
- Clear Polyurethane
- Primer
- Paint of your choosing for your design
- Foam brush
- Paint roller
- Large bristled brush
- Drop cloth
- Painters tape, unless you're free-handing a design

I purchased a linoleum scrap at Lowe's. This was more expensive than I expected, and ended up being around $20. The scrap wasn't perfectly even, but luckily it was a grid pattern, so I had built in guidelines to trim it down to an even rectangle. Be careful not to cut through and mess up your floor! The linoleum I worked with was brittle enough that I could score it with an exacto knife, fold it, and tear.

Next, I primed the reverse side with white primer and a paint roller. I think I used Kilz, since it was cheapest. Let this dry completely.

Maybe the paint fumes made my brain slow down momentarily, but I had more trouble than I expected taping off the chevron pattern. I went for thin black stripes widely spaced so I could save time by cutting down on the amount of spaces to tape off. I put down my initial stripe, then measured a set number of inches up from each point and marked with a dot in pencil to make the next stripe. Then I would get confused as to whether I was taping down the inside or outside of the angle, whether my tape should be above or below the dot, and so on. My stripes didn't turn out perfectly spaced, but it's not very noticeable, since this is on the ground, being walked on.

I used black acrylic craft paint and a foam brush for the stripes. Let these dry completely before peeling up the tape (ie. several hours) or your lines won't look crisp.

The next day, I used a large bristled brush to put two coats of clear polyurethane on the mat. I opted to do this on my porch for plenty of ventilation. The tree next to me opted to drop tiny bits of debris into the wet polyurethane. Again, it goes on the floor, so it's okay if it's not perfect. I wish I had researched how to clean polyurethane off brushes, since I had to sacrifice the rock-hard brush after it dried.

After the supply cost and time spent, I wouldn't consider this a bargain project, but it sure looks nice in my livingroom.

I think if I make another one of these, I'll do a simple checkered pattern, or something free-hand. Measuring the precise chevron pattern took a little of the crafting fun out of it for me, and I began to get frustrated. A friend's mom made a pretty floor mat with big free-hand polka dots on a beige background for a kitchen. What pattern would you choose?

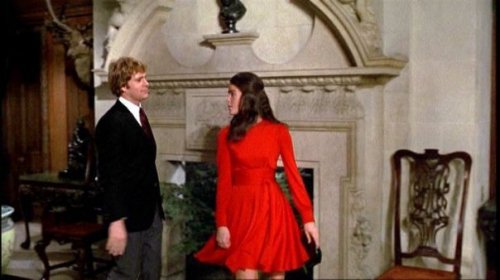
(Above: The Red Room, from the David Lynch series Twin Peaks)
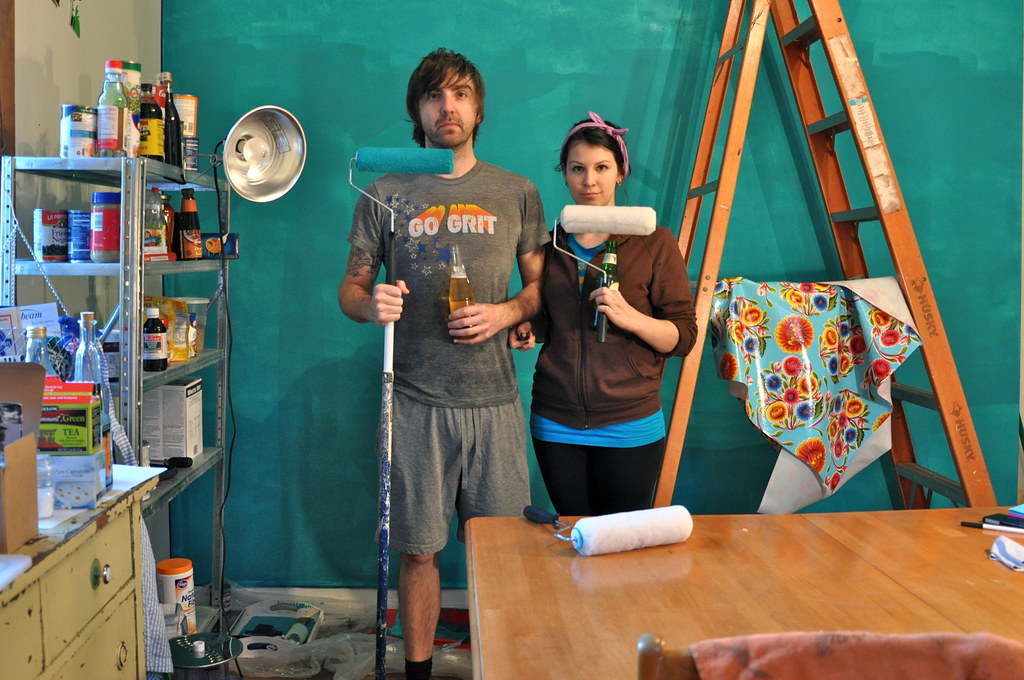
Saturday, December 24, 2011

Style Inspiration: Miss Piggy


While I may be straying a little bit from what I meant for these style inspiration posts, with The Muppets in the theaters right now, I think Miss Piggy deserves a nod. This gal is glamorous year after year and knows what she wants. Really doesn't seem to age a day, either!
According to Muppet.Wikia,
"From modest beginnings (which she is quick to gloss over), Miss Piggy first broke into show business by winning the Miss Bogen County beauty contest, a victory which also marked her first meeting with the frog of her life, Kermit (whom she often calls "Kermie"). The rest, as they say, is history (and a lot of juicy gossip, too).
In 1976, Miss Piggy started out in the chorus of The Muppet Show. Thanks to her charisma and a correspondence course in karate,[1] Piggy made her presence known and soon became the lead chanteuse and femme fatale on the show.

In her interview on Take Two with Phineas and Ferb, when Phineas asked what it was like to grow up on the farm, Piggy replied "Very humbling... I don't like being humble, so I got out fast."

In 1998, Miss Piggy had her own perfume released titled "Moi."


From Pigs In Space:

With Johnny Cash:

Miss Piggy with adoring guests George Hamilton and John Ritter:As the Wicked Witch of the West:
Piggy advises to "snackcercise:"


And her own line of OPI polishes, out right now to celebrate the movie:
(image via disneyeveryday.com)


As Wonder Pig: As Wonder Pig:

Wednesday, December 21, 2011

Picks from the 1975 Sears Wish List Catalog

Today Buzzfeed posted images from the 1975 Sears Wish List catalog.

I'd be happy to find a few of these things under the tree now! Who's got a time machine I can borrow?Pizza Hut Easy Bake Oven? Yes, please!
Maybe I can re-fashion this men's Budweiser nightgown into a mini shift dress?

Air Plants + Mudpuppy Ceramic Pendant Holder

I've been curious about air plants, and this simple, sleek ceramic air plant holder from Mudpuppy Ceramic Studios was the tipping point for me.

Fab.com, a great site with daily design deals, has several styles and colors at a discount, but only for the next day or so. I had a $25 credit (if you refer a friend, you get $25 when they make their first purchase!) so I picked up the small black/gold planter (above, $25.20 on fab, $36 retail.) When the sale on Fab ends, you can purchase these directly from the artist, Michael McDowell.

I've seen inexpensive large lots of assorted air plants on eBay and Amazon, so I think I'll get some friends to go in on an order with me and split them up.

I can't wait for this unique and functional piece of pottery to arrive. Time to decide where to hang it!

Any air plant fans out there? How did they fare? How did you display them? Favorite varieties?


(Photo from the artist's website: MichaelMcDowell.com)

Monday, December 19, 2011

Recipe: Egg cooked in an avocado

A recipe from the cooking blog Apron Strings for how to cook an egg inside of a thick slice of avocado kept popping up on my Pinterest feed. I finally had a relaxed morning for this recipe/science experiment.
I ran up to Los Compadres, our local Mexican grocer, this morning to grab the basics, and picked up Goya frozen plantains and frozen cheese arepas as well. (I'm still not entirely sure of the difference between an arepa and a pupusa. Is one corn, and one flour?)

Edit: My pal Luis says arepas are sweet, and pupusas are not.


I sliced the sides off each avocado, creating a thick slice in the middle. I loosened the seed gently with a small knife, and popped it out with my thumb. It's important that whatever side with face your pan is perfectly flat. One of my avocados was cut a bit roughly, and the egg poured right out of the bottom of it.
(Above: Not smooth enough! Egg will pour right out the bottom! Below: Just right.)
Using the small knife, I made the hole large enough to hold one egg. Keep in mind they will expand a teeny bit.

I found it easier to crack each egg into a small cup first in case I needed to fish out any egg fragments. The cup also allowed me to slowly pour each egg into each avocado without a plop and a splash.

On a stove burner from 1-10, I set it on 5, and my pan was already very hot from cooking up the plantains and arepas. I placed the avocados in the pan, slowly poured in the eggs, and covered them. The cover really helped the top parts cook from the trapped heat. Without it, the bottoms of the eggs would have been so burnt before the top set.

I left my yolks a bit soft, and cooked them 8-10 minutes, watching them closely and testing the insides with a knife.

On the avocado I didn't cut smoothly, half the egg poured out, but the mess-up was still tasty. The smooth-cut avocado turned out perfectly, especially with a little pepper.

The plantains and arepas were a good buy. The arepas tasted like cheese-filled cornbread pancakes.

Note: Apron Strings also has a recipe for eggs cooked in bell pepper rings. They look like flowers! I'll have to try this next.
Photo credit: Apron Strings

Wednesday, December 14, 2011

Style Inspiration: Ali MacGraw

When I was little, my grandpa would call my Ali MacGraw as a nickname. As a little kid, I had no idea who she was, but as an adult, I wish people still gave me that nickname! I'd be so flattered!

(Photos pulled from my vintage inspiration Tumblr, This Snakeskin Jacket, where some credits can be found, though most are just traced back through reblogging.)


Ali MacGraw and Robert Evans at ‘21’ Club in New York, June 5th, 1970.


Ali MacGraw and Steve McQueen in The Getaway (1972).
Related Posts Plugin for WordPress, Blogger...